Last Updated on November 22, 2023 by Rick Darlinton
Fed up with your slow-loading computer? Can’t understand what’s causing all the fuss? Well, the cache may be the culprit in your case. There are several temporary files that make Windows functional. These temporary files are called cache. Well, sometimes the size of the cache exceeds its normal, and it starts to mess up your computer. So, whenever you face warnings saying “you are low on storage” (despite not having enough files) or some unexpected behavior, your first reaction should be clearing the cache. Don’t know how to clear cache? Don’t worry, as this article will discuss six different ways about how to clear cache in Windows 10/8 or 7.
Clear Cache in Windows using Disk Cleanup
The first method in our list of clearing cache is using “Disk Cleanup.” Below are the detailed steps about how to clear cache in windows 10/8/7using Disk Cleanup
- Click on the “start” button and search for “Disk Cleanup” or open the “windows run” program by pressing “Windows Logo Key + R” and type “cleanmgr.exe” and hit enter.
- Wait for it to open and then select ‘C’ drive when the first window appears.
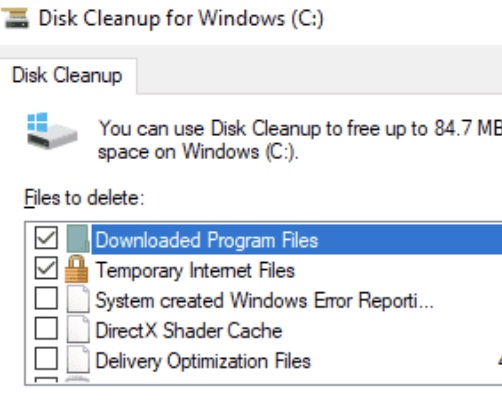
- Wait for disk cleanup utility to calculate the free-able space.
- At the bottom left, you will find the “Clean up system files” button. Click it.
- And then check the temporary files (you may select other files as well).
- Hit ‘OK’ button.
- Then it will ask you to confirm deleting files. Click on “delete files,” and you are done.
The Disk Cleanup utility will take a few moments to complete the deleting process, and boom! All temporary files cache is removed!
Clear Windows Store Cache
Windows Store is one of the most important built-in Windows 10 applications. It creates temporary files while downloading applications, and they turn into junk if not cleaned from time to time. This junk may cause windows to behave unexpectedly and can cause performance issues. To clear the windows store cache, follow the below-mentioned steps.
- Execute the windows run the program by pressing “Windows Logo key” and “R.”
- Type “wsreset.exe” and hit enter.
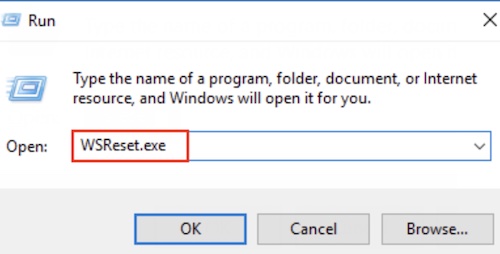
- A black window will appear on the screen and will start cleaning the store cache. The only thing you need to do during this step is to sit back and relax. The process is completely automatic.
- As soon as the process completes, the windows store will launch, which means that the cache is cleared.
Clear Browser Cache
People usually complain about how slow their internet browser works and how it slows their computer. And slow browser launching is another issue users reported. Browser cache is the reason behind most of these problems. Follow the below-mentioned steps to clear cache or cookies in Windows in different internet explorers
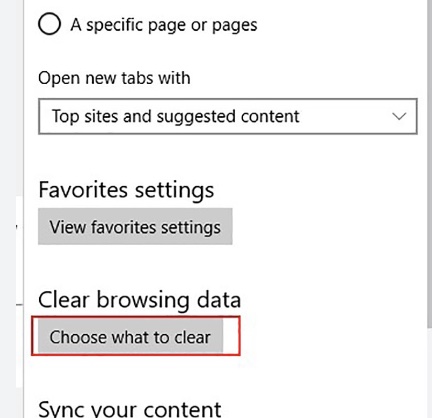
– Microsoft Edge
- Click on the three dots icon located at the upper right.
- A drop-down menu will open. Click on “settings.“
- Under “Clear browsing data,” click on “what to clear.”
- Select all the options you want to clear, and then finally press clear.
– Google Chrome:
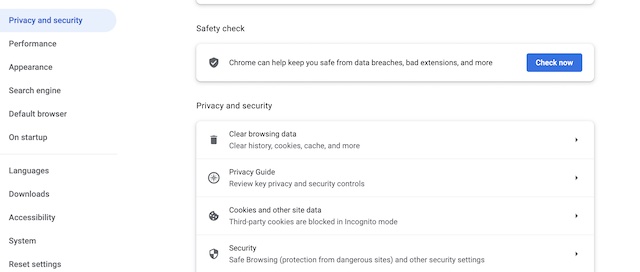
- Click on the three vertical dots in the upper-right corner.
- Select “Settings” located just above “help.”
- Now from the left pane, click on “Privacy and security” and click on “Clear browsing data,” on the new window, select all the desired options and press the blue button with text saying “clear data.”
– Mozilla Firefox:
- Click on three horizontal lines located in the upper-right corner.
- From there, select “options.”
- Now on the left pane, under the “privacy and security,” click on “clear history.”
- Then press “clear now,” and you are done!
Internet browsers are known for their RAM-eating ability as they provide huge functionality, but this is not the reason in every case. Sometimes, the cache is the culprit behind different problems. So, it must be cleared from time to time.
Clear DNS Cache in Windows
- Press “Windows Logo Button” or “start” on your keyboard.
- Open command prompt by searching for ‘CMD.’ You can also use the windows run a program to open it. In the run program, simply type ‘CMD.’
- Now type the following command in CMD: ipconfig/flushDNS
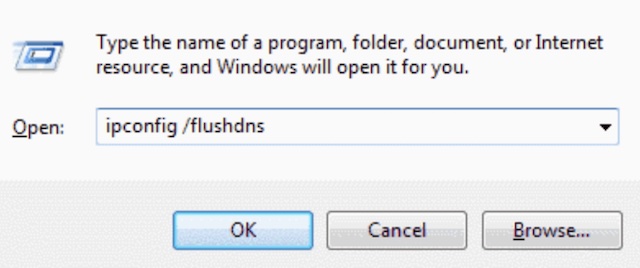
- Hit enter and wait for the process to complete.
- You will see a message saying, “successfully flushed DNS resolver cache.”
- Voila! You are done!
If the command does not work, make sure that there are no typing mistakes in the command.
Clear Location Cache
To clear the location cache, follow along with the below-mentioned steps.
- Hit the windows button on your keyboard and click on “settings,” denoted by a gear icon.
- You will see several options there. Select “Privacy.”
- Now in the privacy window, click on “Location” listed in the left pane.
- Scroll down and find the “Location History” section. Press the “Clear” button located under “clear history on this device.”
Following the above-mentioned steps, you can clear your location cache.
Clear File Explorer Cache
The file explorer cache may also cause some troubles. To clear it, you need to follow these steps.
- Open a folder or click on the “file explorer” icon in the taskbar.
- Now just below the title bar, you will see various options. Click on “view.”
- Now click on the “options” icon, and a new window will appear.
- In the general category and under the privacy section, press the “clear” button and hit “OK.”
Completing these steps will clear the file explorer cache.
Being a windows user, you may face different problems. But brave are those who tackle them. This article was all about teaching you how to clear cache in Windows 10/8 and 7. I taught you how you could remove your browser, windows store, file explorer, DNS, location, and temporary files cache. And I hope that this article gave you what you were looking for. To get the best results without facing any errors, make sure to follow the step-by-step guide carefully.