Last Updated on November 28, 2023 by Rick Darlinton
Just like computers, printers are also very important gadgets. These output devices are what relay the permanent output of any information that the computer generates. And talking about adding printers to Windows 10, it’s all in the quest to enable you to print instantly. Windows 10 does support most printers and additional printer software installation is not something to worry about. It’s a painless task that takes a few minutes to accomplish. Several ways to add your printer for Windows 10 are available. These include using a USB cable to add a local printer and adding your printer via wireless or Bluetooth mode. Let’s look at them deeply.
1. How to add the local printer to Windows 10
Step 1. Connect your printer
Use a USB cable to connect your printer to the computer. Ensure the printer is turned ‘ON’ and wait for the computer to detect it.
Step 2. Choose a printer to add
Click on the ‘Start’ button at the lower left side of your PC screen. Then click on the ‘Devices and Printers’ option. Next, choose the printer to add to your PC.
Step 3. Add printer
Choose the last option ‘Add a local printer or network printer with manual settings’ option. Then click on the ‘Next’ button. Choose the option ‘Use an existing port’ and then click ‘Next’.
Step 4. Install the printer driver
Choose the printer driver you want to install and then swipe ‘Next’ tab. Wait for the printer to finish the installation process. Then click on the ‘Finish’ button once the process is complete.
Step 5. Print a test page
Click on the ‘Print’ icon to print a test page to make sure your printer is successfully installed. The test page will also attest that the printer works.
2. How to add a wireless printer to Windows 10
In this case, ensure that your printer is connected to a power source and that your PC is also connected to the internet.
Step 1. Connect your printer to the wireless network
Ensure that your wireless printer and Windows 10 PC can communicate via the same wireless network. Once your printer is connected, Windows will automatically install the necessary files because they can communicate with the PC via the internet.
Step 2. Check if your PC is on the same wireless network as printer
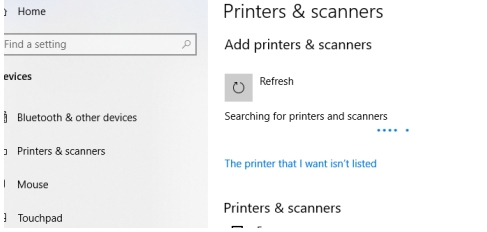
Go to the ‘Settings’ icon just above the ‘Start’ button, then click on ‘Devices and Printers’. You’ll see a list of printers and if yours is successfully installed, you’ll see it among the list. In case it wasn’t installed successfully, you won’t be able to see it. But don’t worry, there are fixes that you can follow to install it successfully.
Step 3. Add Printer
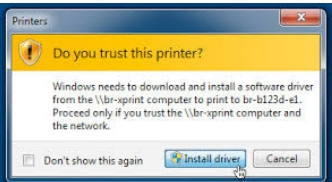
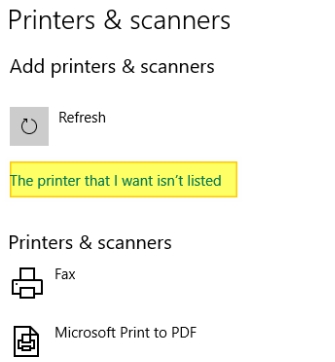
Your Windows 10 PC should automatically detect the wireless printer. You can also access its status, whether it’s connected to the internet and powered on. But errors occur and perhaps your Windows 10 PC can detect your printer. If your printer wasn’t installed, choose the option ‘The printer that I want isn’t listed’. A screen indicating ‘Add Printer’ will pop up.
Next, choose the option ‘Add a Bluetooth, wireless or network discoverable printer’ so as to add your printer. Then enter the Internet Protocol address you’ll use for adding your wireless printer. Click the ‘Next’ button tab.

Step 4. Key in the printer IP Address
Correctly type the IP address and then click the ‘Next button. Your PC should by now detect the IP port so that the printer is recognized. Wait for Windows 10 to identify your wireless printer.
Step 5. Add your printer to Windows 10 PC
Once installed, your printer will be added to the available list of ‘Devices and Printers menu. Pick on it and hit the ‘Add Device’ option to accomplish the addition to Windows 10 PC. If successful, there will be a ‘Ready’ messaged indicating that your wireless printer is ready for use.
Step 6. Ensure your printer is working
Do this by printing a test page. Click on any file from your PC and print a test page.
3. Fix printer connection problems
It is a common phenomenon for you to experience printer connection problems. It could be an error message, paper jam, or other frustrating conditions. These fixes could just help you get off the hook.
Paper jam problem
Paper jam happens when the printing papers are not correctly aligned in the paper tray. Another problem could be from the pick up rollers. Fix this by removing stuck papers or replacing the pick up rollers if they are worn out.
Network connection problem
Using wireless connectivity comes with a double share of the good and the ugly. It enables you to do the connection of your printer to any of your devices and continue with printing. On the other hand, connectivity problems may hinder communication between your devices.
To fix such problems, check if your printer is connected to the network by checking the control panel, then the Wireless Network Test Report for insights of network connectivity.
You can also check other devices like the router and whether they are assigned a different IP address. If so, do a reconfiguration.
Printer Driver Problems
Your printer’s driver needs to be working properly. An issue with the driver like losing compatibility with the operating system or being outdated may cause printing problems.
To fix this, uninstall the driver and re-install an updated version.
Printer Hardware Problems
Hardware problems can also cause your printer not to function. It can be anything from power cord issues, clogged rollers from printer ink, or broken gears.
Fixing hardware problems require replacing the corresponding parts like the broken gears. Also, maintain cleanliness on the rollers to prevent ink from clogging them.
Conclusion
Adding printers to Windows 10 does not require hi-tech know-how. This article has tackled two simple ways. Furthermore, it has highlighted the common printer connection problems and their fixes.
Also read:
Best Windows backup software tools