Last Updated on March 13, 2022 by Rick Darlinton
Moving iPhone photos and videos to your Mac can save massive space on your mobile gadget. Also, it is easier to edit and retouch when you own a larger screen with higher resolution. Good news a native Mac tool allows you to convert, resize, and organize your photos in no time. This article sheds more light on how to transfer photos from iPhone to Mac.
iCloud Photo
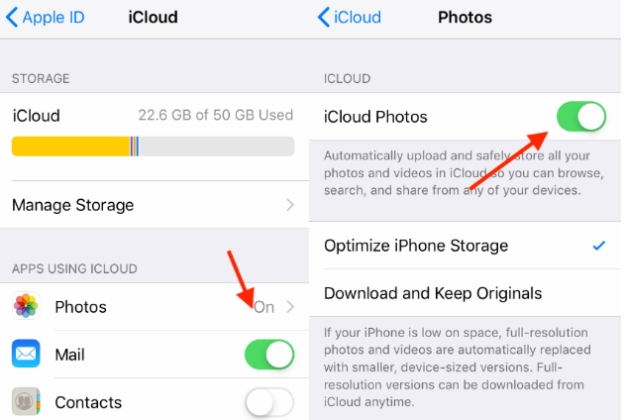
This is pretty simple. Just activate iCloud images to allow your iPhone photos to be stored in iCloud so that you can view and download them from your Mac. But remember, iCloud Photos is Apple’s online photo storage service, so you must be signed in with the very Apple ID on your iPhone and Mac. Here is how to import photos from iPhone to Mac with iCloud Photo.
- On your Mac, tap the Apple icon at the top-left of your screen. Go to the System Preferences then choose iCloud.
- Check the box close to the iCloud Photo Library
- On your mobile gadget (iPhone), go to Settings, click photos. But make sure the iCloud Photo is on.
How to copy photos from iPhone to Mac with image capture
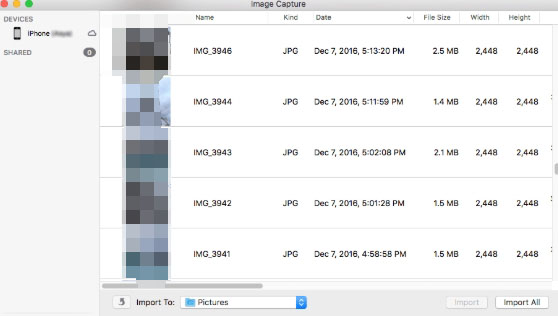
The process to move photos from iPhone to Mac with image capture is quite simple and won’t take much of your time. Follow the steps:
- Get a USB cable and connect your iPhone to Mac. Then run the image capture of your Mac.
- Choose your iPhone from the device list if it is not selected. Then set the output folder for your iPhone photos.
- Hit on the Import button or Import All button to sync photos from your iPhone to Mac.
3. How to transfer photos from iPhone to Mac with Anytrans
Even though iCloud Photo is perceived as an obvious choice for image importation, the truth is it can’t miss flaws, hence not a very realistic solution. You may be wondering how to move photos from iPhone to Mac with AnyTrans. AnyTrans make much more sense here as it can help you import all content from your iPhone within no time, and back it up at that particular time.
AnyTrans helps you move content even with a combination of any backup tool and media downloader. Here is how you can use it to move photos from your iPhone to Mac.
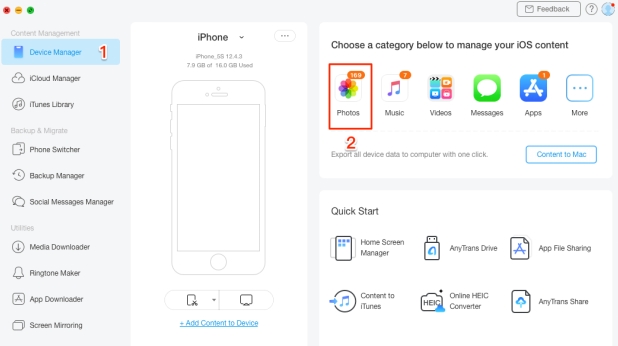
- Launch AnyTrans and make sure all your devices are connected to the same network.
- Connect your iPhone to your Mac’s USB port
- Let AnyTrans access your photo library
- Go to Device Manager and then Export iPhone content to the computer.
Your content will move instantly. It also syncs with iCloud. In other words, you shouldn’t panic that your photos have no backup.
4. Transfer photos from iPhone to Mac with iTunes
Well, there are several best ways of moving a file from an iPhone to a Mac, like using iCloud, handoff or airdrop, message, or even email. But only where there’s super Wi-Fi connection. With iTunes, you can transfer a 2GB file without a Wi-Fi connection.
IOS has got no accessible file system like macOS. Instead, every file has its document library. iTunes allows you to transfer data to and from every app library. Check the following steps;
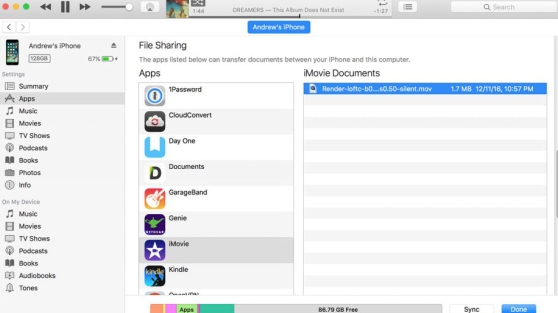
- Plugin your iPhone to a computer with iTunes, your device will show up in the program
- In the iTunes application on your computer, press the device button on the left sidebar. Scroll down to find the file-sharing icon, which bears a list of latest installed apps able to help you transfer files.
- Choose file sharing
- From the file-sharing list of apps, choose the app on your iPhone that you want to transfer images from or to.
- Choose either of these;
- Move a file from your computer to your device; press the Add button, choose the file you want to move, then press Add.
- Move a file from your device to your computer; choose the file you want to transfer in the list on the right, then press the ‘save to’ icon after selecting where you would want to save your file.
5. How to move photos from iPhone to Mac with AirDrop
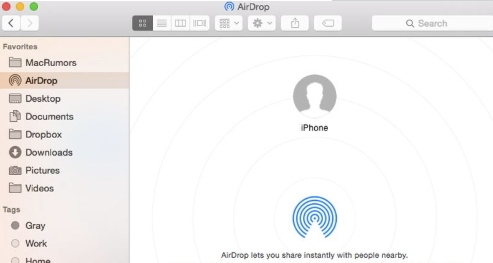
To transfer your photos successfully ensure your iPhone, iPad or computer are connected to steady Wi-Fi. Bear in mind that airdrop requires a contemporary mac model running OS X Yosemite to smoothly copy photos from iPhone to Mac with airdrop. Here are the steps to follow while using airdrop.
- Open the photos application on your mobile device
- Choose all the photos you would like to move to computer and then click the share button.
- You will see airdrop at the top of the share menu
- Select your device’s name
If you succeed you will see a text (Sent below your device’s name)
Transfer photos from iPhone to Mac with Dr. Phone Manager
Dr. Phone manager is a one-stop solution to data transfer and management. Compared to other ways you can use to transfer photos from iPhone to iMac, dr.fon is safer and faster. What’s more, it has a user friendly interface that makes all the data management fast and intuitive, something that makes it a highly trusted app. Allow the three simple steps to move your photos from iPhone to Mac with Dr. Phone manager.
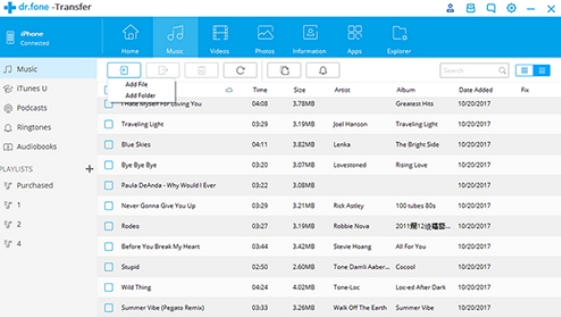
- Connect your iPhone to your pc with the USB cable
- Select iPhone data
- Transfer iPhone data (data will be transfer in less than a minute)
Also read: How to transfer files from Android to PC
Final thoughts
Even though you can get seven or more ways to transfer photos from iPhone to Mac, using Mac Mini, MacBook Pro, Mac Pro, and iMac, most of them strictly support camera roll images. To move images stored in other albums, you will need to look for other solutions. Just like the ones shared above, when it comes to transferring and managing iPhone images, Some third party programs such as Dr. Phone Manager and Anytrans can be considered.
Apart from just transferring photos in no minute, they can transfer other IOS files such as contacts, messages, videos, notes, movies, among others. Not to mention its ability to transfer data from one iPhone to another apple device directly and keeping your data safe from viruses.
Related Posts
How to transfer files from Android to PC
