Last Updated on July 12, 2023 by Rick Darlinton
When it comes to video editing for free, many people will consider using Lightworks free video editor to create some awesome and wonderful videos on your Windows or Mac. One of the perfect features available in Lightworks is it’s useful video transitions that you can use to make the videos look smoother. So in this tutorial, we are going to introduce how to add transitions in Lightworks easily you wish. Let’s get started now!
Part 1: How to add transitions in Lightworks in Timeline
It is super easy to add transitions in Lightworks from its timeline. You just need to download and run the Lightworks free video editor on your pc. Please note the free version only lets you export video to MP4 format and supports a video resolution of 720P. If you want to explore some advanced video features, you may need to upgrade to the free version.
Download and run the lightworks
Open the Lightworks software on your Windows or Mac. Next, register an account with your email.
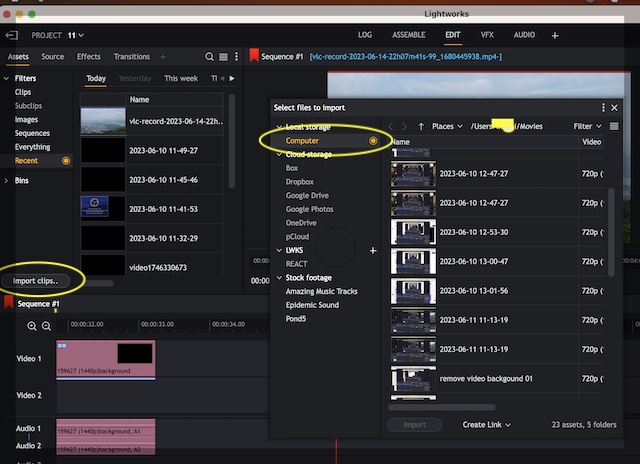
Import the videos
After the registration, please import a video file by clicking on import clips from the left panel and then select a folder to add the videos to lightworks. When this is done, just drag the video file to the Lightworks timeline. You can also follow the same steps to add more videos to the Lightworks
Split the video clips
Before you begin to add transitions in lightworks editor, you need to determine where you want to apply the transitions. usually, the transitions are applied between two video clips. so, you may need to split or cut the videos before applying the transitions. To split the video in lightworks, just move the playhead bar to the point where you want to cut the videos and then left-click the video section. after that, just press C key on keyboard to split the video into clips.
 Add transitions in lightworks editor
 Add transitions in lightworks editor
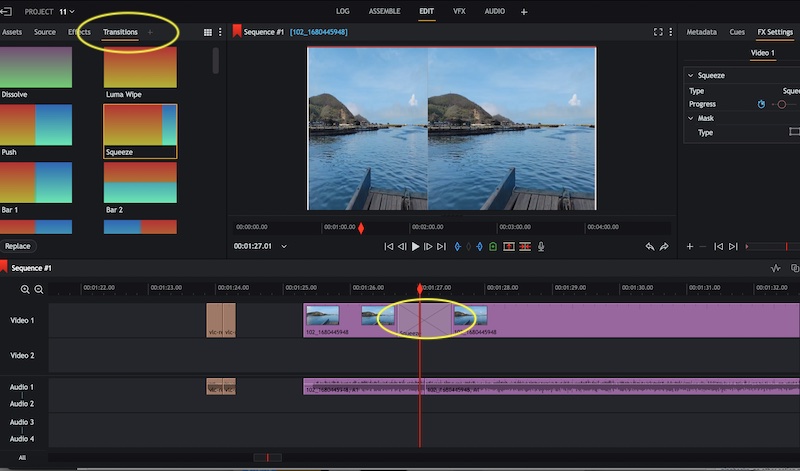
To add transitions in Lightworks between 2 different video clips, just click on transitions in the left-upper section and drag the transitions to the centerline of 2 video clips as shown below. For example, you can select squeeze transition if you like it. For the duration of the transition, you can set it for 10 frames or more to control the length of the transition.
When the transition is added between the video clips, you could check whether it looks smooth or not. To check it conveniently, just tap on Zoom in or zoom out icon at the left top of the timeline interface.
Adjust the transitions in lightworks
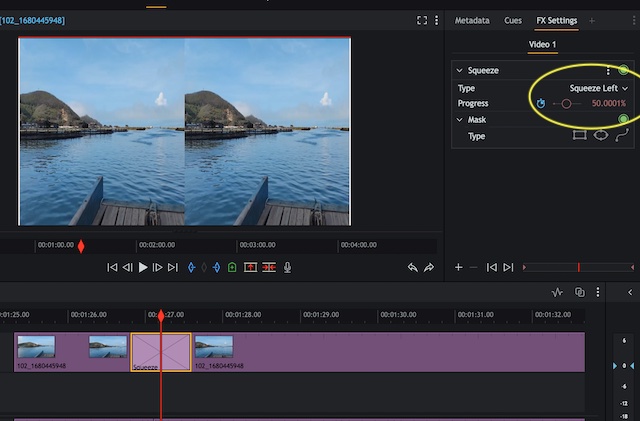
Lightworks editor also enables you to adjust the transition progress and how it moves.for example, when you select squeeze transition, you can change its type, mask and moving directions starting from left, down or right.
Part 2: How to add transitions in Lightworks using VFX
Another solution you can try to add transitions in Lightworks is to use its powerful VFX video editing feature.
- Click on VFX at the top of the interface and tap on transitions at the top.

- When this is done, just select any transition you like and move the mouse in the timeline to a proper place where the transition will end. When you move the mouse, the frames number from the left panel below the transition will change. For example, here you can stop moving the mouse when it shows 10 frames.
- After that, just tap on apply effect. Similarly, from the timeline, you can zoom in or out of the video clip to check whether the transition looks perfect.