Last Updated on March 14, 2022 by Rick Darlinton
You may often hear about the word of Sitemap if you are working on SEO. No matter your site is large or small, creating a sitemap and submitting sitemap to Google is helpful to SEO from the perspective of crawl indexing. In this post, we are going to show how to create a sitemap and submit sitemap to Google.
What is a Sitemap
The sitemap is a kind of file that contains the files such as pages, images, videos and more you consider important on your website. Having a sitemap on your site could make sure the search engines like Google crawl your site contents more efficiently.A sitemap is also helpful to let the search engine bots understand your site’s structure easier.
Should you submit a sitemap to Google?
If your site is small and the pages are well linked within your site, you may do not need a sitemap. But we still recommend you create a sitemap and submit it to Google as it could help increase the contents crawl efficiency.
We suggest you need to submit a sitemap to Google based on the following scenarios
- Your site is large with a complex site structure
- Your site pages are not well linked internally.
- Your website is new
- Your site does not have many external backlinks
How to create a sitemap
When it comes to creating a sitemap, it depends on how large your site is. Also if you have professional IT experts, this should be easy for them to create a sitemap. If you need to create a sitemap by yourself without technical support, then you can also create a sitemap yourself. In terms of sitemap format, XML format is usually recommended.
-
Create an XML sitemap manually
You could create a sitemap manually if your site is small with a few URLs. First of all, you can check some Sitemap guidelines from Google and then check the sitemap file from your competitors or other sites by entering www(dot)example(dot)com/sitemap.xml After that, you can manually create your own sitemap much easier.
-
How to Create an XML sitemap automatically
If your site is large or you find it is so tedious to create a sitemap manually, you can use some third-party sitemap generators such as the xml-sitemaps sitemap generate tool. It has a free version that lets you generate a sitemap for free if the pages are less than 500. But if your site includes more than 500 pages, you will need to use its pro version. The pro version has detailed features such as up to 1,500,000 pages and uploading sitemap without reuploading it to your website.
If you do not want to automatically update your sitemap with the Pro sitemap tool, you can also manually create a sitemap using the pro sitemap tool and then upload the sitemap to the root directory on your website. But please note if you create a sitemap manually with this tool, you need to create the sitemap regularly as new content is published on your site and then also update the sitemap on your website.
What to do after creating a sitemap?
After creating the sitemap, you need to upload the XML sitemap file to the root directory of your website under public_html. If you are not sure how to do this, you may need to ask for help from IT experts. When this process is done, you could use some sitemap validator tools online to check whether the sitemap works properly. Just search for sitemap validator tools in google online and select one of them to validate your sitemap file. You can also enter www(dot)your domain(dot)/sitemap.xml and see if the sitemap files are visible here.
How to submit sitemap to Google
- Search for Google search console and register an account
- Select add a website property. Here you can select a domain or URL prefix. We recommend you choose to verify using URL prefix as it is easier to verify. But note HTTPS and HTTP is different so you need to enter your URL correctly here.
- You could select HTML tag
- Copy the code you get and then inset the code in the between the <head> and </head> part. If you are not sure how to insert the code in this step, please ask for help from your technical support team.
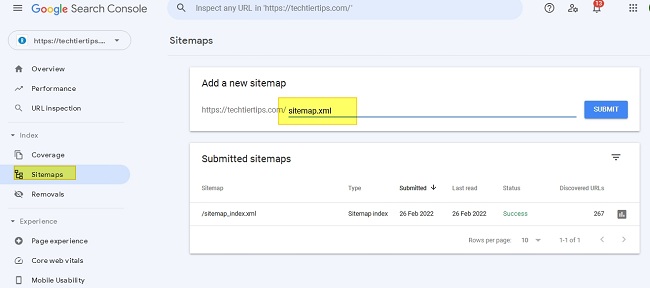
- After verification is finished, just go to google search console and then find the sitemaps option on the left side bar
- Next, if your sitemap ends with sitemap.xml, just add enter sitemal.xml in the box and click on submit. If the sitemap is submitted successfully, it will show success at the end the sitemap.
How to submit sitemap to Google in WordPress
It is much easier to create sitemaps and submit sitemaps to Google in WordPress as you could use some third-party WordPress plugins such as Yoast SEO.
How to create a sitemap in WordPress
- You can use the plugin of Yoast SEO as mentioned above. Just install and activate this plugin in WordPress. After that, follow the steps below to create a sitemap in WordPress
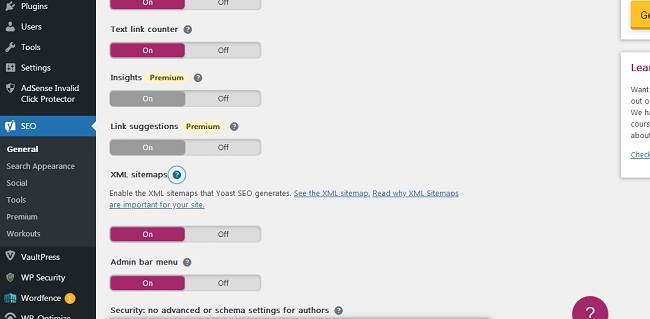
- After the Yoast SEO is installed, click on SEO on the left bar and then select the General option.
- Now click on features and scroll down to select the XML sitemaps. Just turn on this feature
- Next, click on the icon of ? next to it and then tap on the option of See XML sitemaps to check whether the sitemap works or not. The sitemap may end with sitemap_index.xml
How to submit sitemap to Google in WordPress
After your sitemap file is working properly, you could go to the Google search console and register an account according to the steps mentioned above.
Just note to verify the Google search console in WordPress, you could use a plugin called Insert Headers and Footers. After activating this plugin in WordPress, just go to Settings on the left side in WordPress and then find the Insert Headers and Footers. After that, just copy the code from the Google search console and then paste the code under the box called scripts in header to verify the google search console.
Just note if your sitemap ends with sitemap_index.xml, you need to enter sitemap_index.xml instead of sitemap.xml in the box.
How to submit sitemap to Google in Shopify
It is very easy to submit a sitemap to Google in Shopify as all Shopify stores automatically generate a sitemap which is a sitemap.xml. This means you do not need to create a sitemap. Instead, you just need to submit the sitemap to Google in the Google console. Follow the steps below about how to submit a sitemap to Google in Shopify.
- Go to google search console and register an account
- Select a property type. You can select URL prefix as mentioned earlier and then enter your site URL starting with HTTPS://
- Now you need to verify your google search console for your Shopify site. You could select HTML tag.
- Now go to the admin page on your Shopify site and go to online store> themes>actions>edit code
- Find the Layout section and select liquid
- Paste the code given by the google search console and paste the code between the <head> and </head> part. Here you can search for </head> in the search box and put the code before the </head>
- After the verification, just go to the dashboard of the google search console and select sitemaps on the left side. After that, enter the sitemap.xml in the box.
Related Posts