Last Updated on January 2, 2024 by Rick Darlinton
Capcut is one of the best free video editors for multiple platforms including windows, Mac, Android and iPhone. When you edit a video, you may want to blur a part of the video or even blur the whole video. In this article, we introduce some solutions about how to blur a video on Capcut step by step on iPhone or android. Now let’s get started to know the detailed steps below.
How to blur the whole video on Capcut
It is very easy to blue a whole video on Capcut on iPhone or Android. Just follow the steps below.
- Download and run the Capcut free video editing app on your iPhone or Android phone.
- Click on the new project to upload the video to the Capcut.
- Select the whole video and tap on effects at the bottom of the screen. Next, choose the video effects.
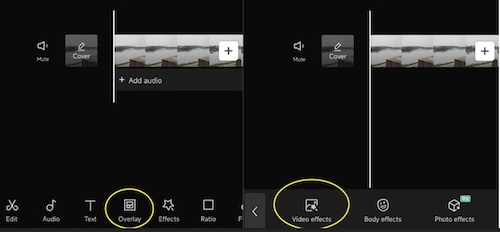
- Select lens and then scroll down until you find the blur option.
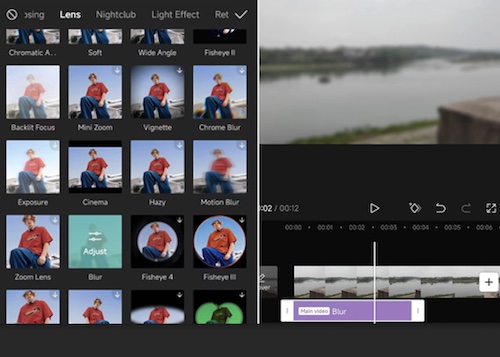
- Click on the confirm button and click on the blur clip in the timeline. Next, drag the edge of the blur clip in the timeline and make sure it is lined up with the video.
- Finally, export the video
As you can see, it is very easy to blue a whole video on Capcut.
How to blur objects of a video on Capcut
Sometimes, you may just want to blur a portion of an object of a video on Capcut. If this is the case, you can check the solutions below about how to blur objects or faces in a video on Capcut.
Blur the whole video
Similarly, upload the video to the Capcut and then select the whole video and blur it as mentioned in part 1 above.
Add an overlay video
- Next, click on overlay at the bottom of the screen and tap on add overlay to add the same video to the Capcut.
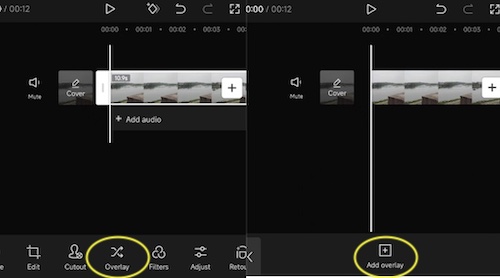
- Drag the start part of the overlay video so that it is lined up with the first video.
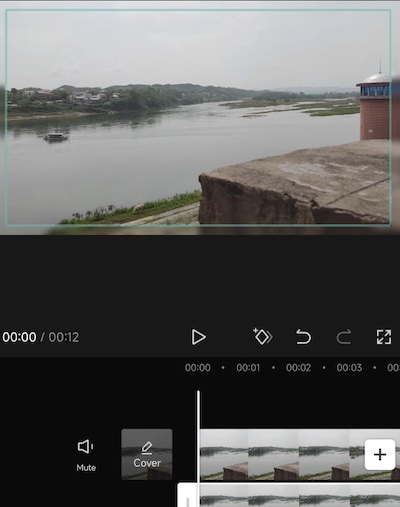
- Also, adjust the overlay video in the preview screen so that it fits well into the screen.
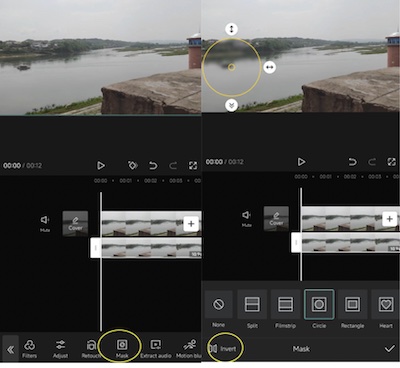
Mask and blur the object of the video.
Select the second overlay video and then find the mask feature at the bottom of the screen and then select the mask shape. Capcut offers several mask shapes including split, filmstrip, circle, and more. For example, you can select circle mask and click on the confirm button. Besides, you are also able to adjust the size of the blur circle.
Subsequently, click on the invert button at the left-down corner of the screen to blur the object of the video on Capcut. You can also slide the blur label up or down to adjust the blur level.
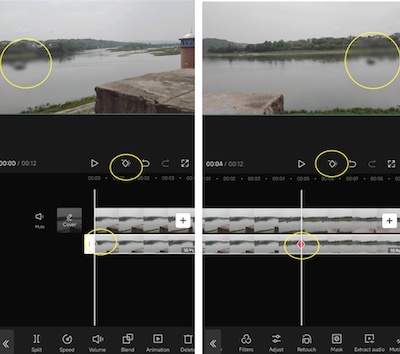
Add keyframes to blur the moving object
However, it is not finished yet. When you preview the video, you may find the object is moving in the video and it is not blurred all the time as required if it is moving. But you can add keyframes to fix this issue.
To make sure the moving object is blurred in the video, just add a keyframe to the place where you start to blur the object. For example, in the video below, if you want to blur the moving boat in the video, just add a keyframe and move the blur circle to cover the boat. Next, add another keyframe to the place where the blur will stop showing, and then move the blur circle again to cover the boat. You can also repeat this process so that it can suit your editing requirements.

How to blur the background of the video on Capcut
Capcut also allows you to blur the background of the video without using a green screen. To do this, just follow the steps below.
- Add the video to Capcut and then blur the whole video as mentioned above.
- Tap on overlay and then click on add overlay to add the same video to the Capcut .
- Adjust the overlay video size so that it fits into the screen.
- Find the cutout option at the bottom of the screen.
- Next, you can choose to click on remove background to blur the background of the video.
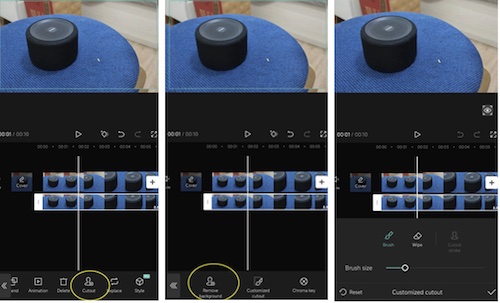
- Alternatively, a customized cutout feature is available, which lets you adjust the focus area in the video. Besides, the brush size can be adjusted and it is helpful to blur the background of the video. If you are adding a green screen video, just choose the chrome key tool to remove the background more easily.
When everything is done perfectly, move ahead to export the video.