Last Updated on November 28, 2023 by Rick Darlinton
Cropping a video on Mac is very useful and necessary, especially when you want to focus on some specific video parts. For example, you may want to zoom in the specific areas in a tutorial video. Besides, cropping a video can also help you achieve a kind of amazing effects within the video. No matter what you want to achieve for cropping a video, we will show you some details about how to crop a video on Mac. Now let’s get started!
Cropping a video on Mac using iMovie
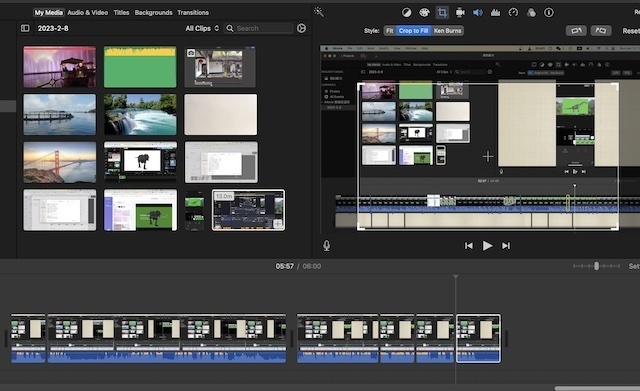
iMovie is a pre-installed video editing software for Mac and what’s more it is completely free. With iMovie video editor, it is very user-friendly to crop a video just by using its crop to fill feature. Compared to other free Mac video editing software, iMovie stands out as it is a very lightweight editing software and it is very quick to export the video to mp4. Just follow the steps below about how to crop a video on Mac.
- Go to launchpad on your Mac and then search for iMovie. Open the program on your Mac device.
- When the program is opened, go to file in the top menu and then select import media to add the video you want to crop.
- Drag the video to the timeline and select the video to be cropped. Before you crop a video clip using iMovie, you could preview the video first and then split the videos if possible.
- To split a clip within iMovie, just move the white playhead bar to the point where you need to split a video and then press command +b to split clip the videos. Alternatively, you can also right-click the mouse and select split clip to split a video.
- Next, select the video clip you want to crop and then click on cropping icon in the upper-right corner. After that, select crop to fill option to start cropping a video on Mac.

- To crop a video, just drag the edge of the white box and move the box to any area within the video.
How to crop a video on Mac using lightworks
Lightworks is another free video editing software for Mac users. This software is also lightweight and the video export process is quick compared to other heavy editing programs. Lightworks comes with varieties of video effects, subtitles and transitions that can make you create some alluring videos. Now just check the instructions below about how to crop a video now.
- Download and run the lightworks free video editor on your Mac.
- Click on import clips in the left-hand column to add the video clip to the lightworks and then drag the file to the timeline.
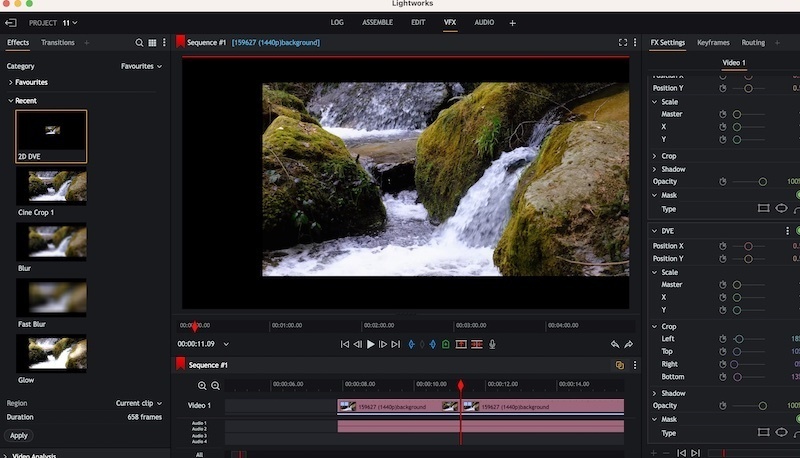
- To crop a video in lightworks, just go to vfx in the top bar and then tap on effects option from the left sidebar.

- Now scroll down to find the effect called 2d dev. Drag the the effect to the video you want to crop. If you need to split a video cup in lightworks, move the the playhead bar to the point where you hope to trim the video and then press c key on the keyboard to split the video clips.
- After that, find the crop option under the fx setting from the sidebar. Just begin to crop a video by moving the slider to any direction.
Cropping a video using Premiere
Premiere is a professional video editing software for Mac that is built with huge selection of advanced video editing features. If you already installed Premiere on your Mac, you can choose to crop the videos in Premiere by following the solutions below.
- First, run the Premiere on Mac and go to file> import to add the video file to the Premiere timeline.
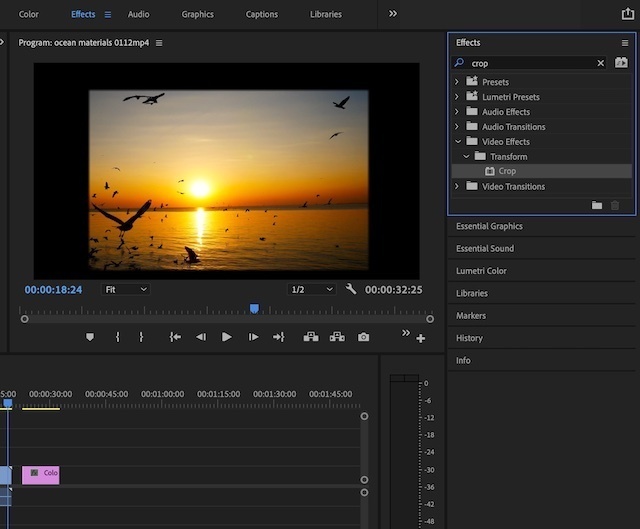
- Now find the effects section in the top-right corner within the program and then search for crop in the box. Alternatively, you can also go to effects>video effects>transform>crop to find the crop tool.

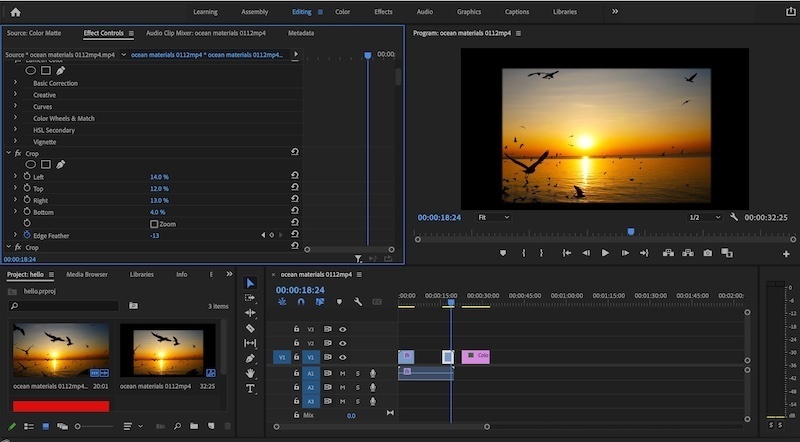
- next, drag the crop effect to the video clip you want to crop and then find the crop tool under the effect controls as shown below.

- Finally, just move ahead to crop the videos in Premiere.
Now we hope you know how to crop a video on Mac. These are some free solutions about how to crop the video clips. Just try these editing programs and begin to crop any video on Mac.
